What Can You Do With Your $2 Bag?
The Fair Foods $2 bag items are always a surprise! Since we don’t know what items we will get until the day of, there is not much room for planning. Fortunately, every bag no matter the day is filled with fresh, delicious items. One simple way to prepare these items is a stir-fry! Below is a quick recipe for you to use with any Fair Foods bag.
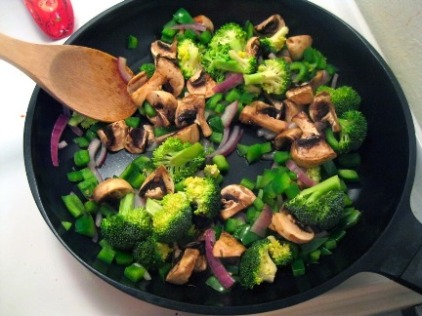
VEGGIE STIR-FRY
Standard Ingredients:
1 Tbsp. Canola oil or Olive oil
1 cup low sodium broth (chicken, vegetable, beef)
Salt & pepper to taste
Suggested Herbs/Spices:
Garlic, Oregano, Parsley, Onion powder, Garlic powder, Cayenne pepper, Chili powder, Cinnamon, Rosemary, Thyme, Basil, Dill, Chives, Ginger
Preparation:
- In a large skillet or wok, stir-fry tougher items (broccoli, carrots and onions) in oil for 5 minutes.
- Add in desired broth with salt and pepper to taste.
- Add desired herbs.
- Add the softer items (cabbage, zucchini, mushrooms and garlic).
- Add additional herbs/broth if necessary.
- Stir-fry until vegetables are tender.
- Serve with brown rice and/or a lean protein choice.
(See previous blog for Balanced Plate suggestions)
So what can you do with your $2 bag?
…the possibilities are endless!
Portion Control
As delicious and satisfying as a heaping plate of food may seem, it is important for all of us to manage our portion to keep us in good health. Believe me, I know how easy it is to eat too much. Our society makes us want everything to be bigger and better. Mega and super sizes are the norms! It is necessary that we understand this environment and that we make it our goal to consume only what is needed to fuel our bodies. One way to eat less is to use the “plate method.”
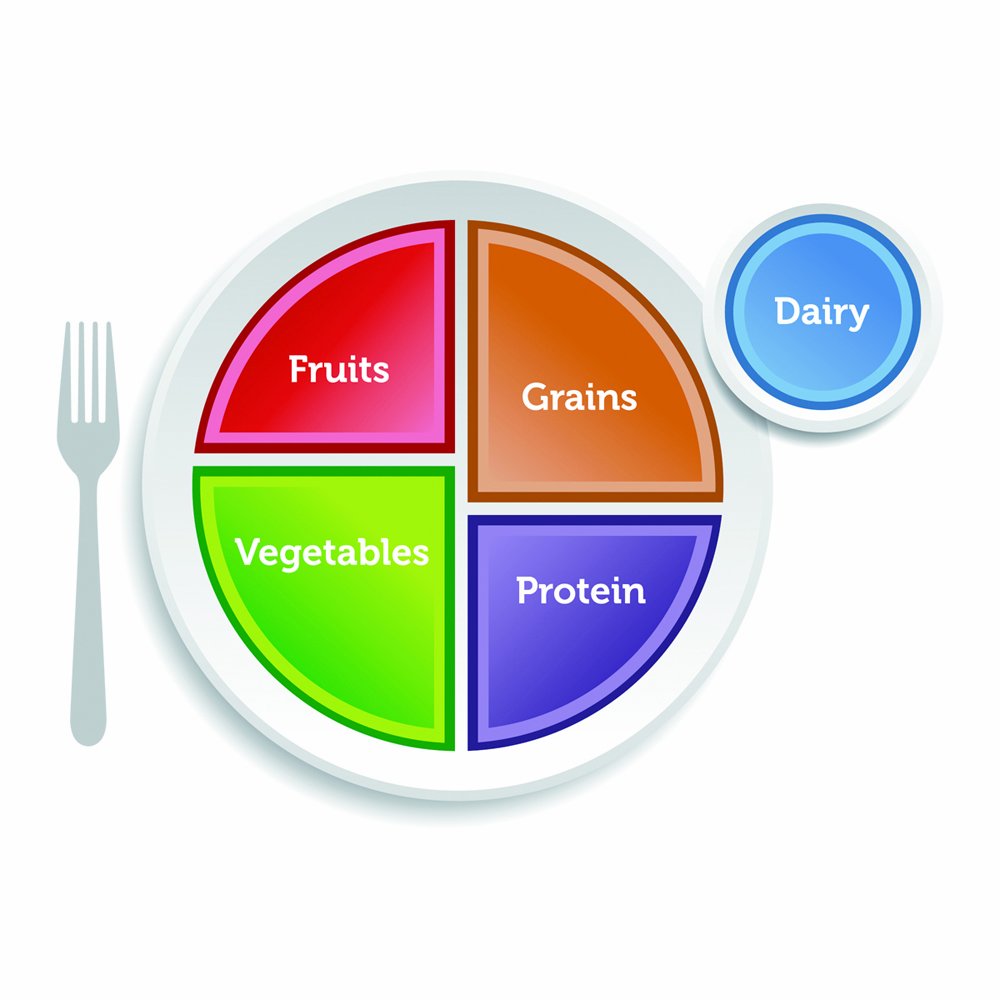
This divides our plates into four sections: fruits, vegetables, grains, and protein. It helps us to visualize what and how much to eat without eating too much. Dairy is also a part of our diet, and we should try to include about three cups of low-fat dairy in our daily diets. If we make our plates look like this every time we eat (and don’t pile the food too high), we can keep our portions in check. Another way to control our portions is to be mindful of serving sizes. Many people don’t know that many packages and containers contain more than one serving. Did you know that 1 pint of Ben and Jerry’s ice cream has 4 servings? I am the first to say that I almost always have at least 2 servings when I sit down to indulge in my favorite dessert. There is a reason serving sizes are created, and we should try our bests to keep within the established recommendations. Eating small snacks can help us to maintain our intake during meal times. Also portioning food into smaller amounts before eating can help to reduce the amount of food eaten at one time. When food is not at our fingertips, we are less likely to overeat. Furthermore, we should be aware of the serving sizes for different foods and food groups. For example, 3 ounces is the recommended portion of protein including poultry, beef, and fish. I know what you are thinking. What exactly does 3 ounces look like? The image below shows hand symbols that can be used to determine how much food to eat.
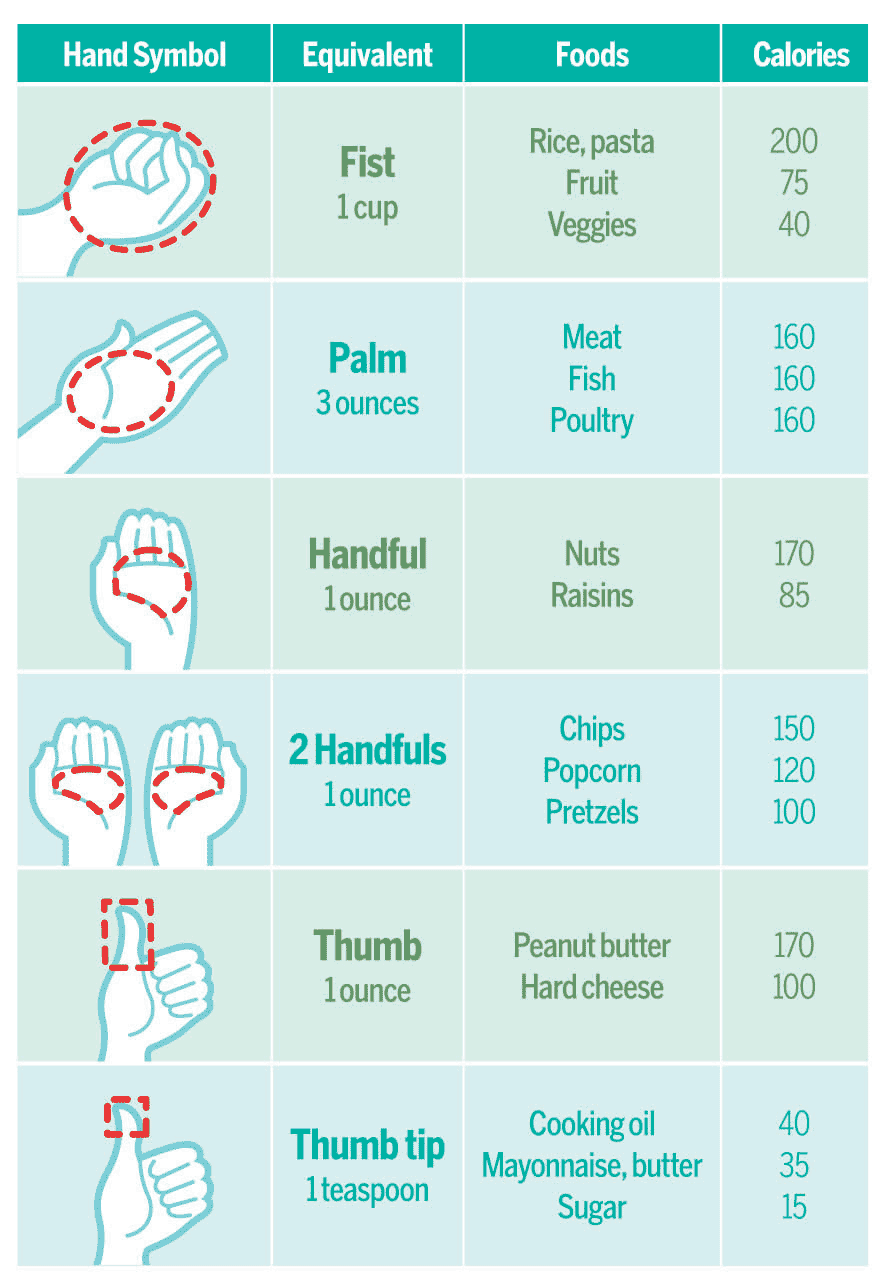
So next time you are served a steak, try to eat a portion that is about the size of your palm and save the rest for a later date. Other tips to help control your food intake include:
– Space your meals evenly throughout the day
– Don’t skip meals especially breakfast
– Eat everything in moderation
– Avoid sugar-sweetened beverages
– Drink more water
– Cut back on high calorie snack foods and desserts like chips, cookies, cakes, and ice cream
– Use smaller plates, bowls, and cups
– Pre-portion your food
– Don’t eat while distracted or in front of the TV
– Eat slowly
– Be mindful of the foods you eat
– Enjoy every bite!
Bake…Don’t Fry!
Fried food is tasty. Its salty, fatty, crunchy coating is extremely satisfying when we are hungry. It reminds us of home, family, and friends. It is easy, simple, and cheap. I wish I could tell you that fried food is good for your heart or that it will help you to lose weight, but this is not the case. Frying food is one of the most unhealthy food preparation methods. When fried, food absorbs fat. This increases the amount of fat and calories that we consume when we eat fried food. Furthermore, foods that are fried are also very salty or high in sodium. Salt is typically added after frying to give foods their characteristic taste. Eating a lot of fried foods can have negative effects on our bodies and can promote obesity, diabetes, heart disease, and cancer. A healthier method of cooking is baking. Baking requires little to no added fat therefore limits the amount of fat and calories that we consume when we eat baked foods. Less salt is also used in this food preparation method. For example, a 6-ounce serving of fried shrimp has about 25.8 grams of fat, 470 calories, and 1500 milligrams of sodium while a 6-ounce serving of baked shrimp has about 4 grams of fat, 220 calories, and 310 milligrams of sodium. It is clear that baking foods is healthier than frying foods as baking leads to foods lower in fat, calories, and sodium. Consuming less fried food can help us all to lead healthier lives with less disease. It is easy, bake don’t fry.
Baked Sweet Potato Fries
Ingredients:
– 3 sweet potatoes
– ½ tablespoon of corn starch
– 1 tablespoon of olive oil
– 1 pinch of salt
– ¼ teaspoon black pepper
– ¼ teaspoon cayenne pepper, paprika, or curry powder (optional)
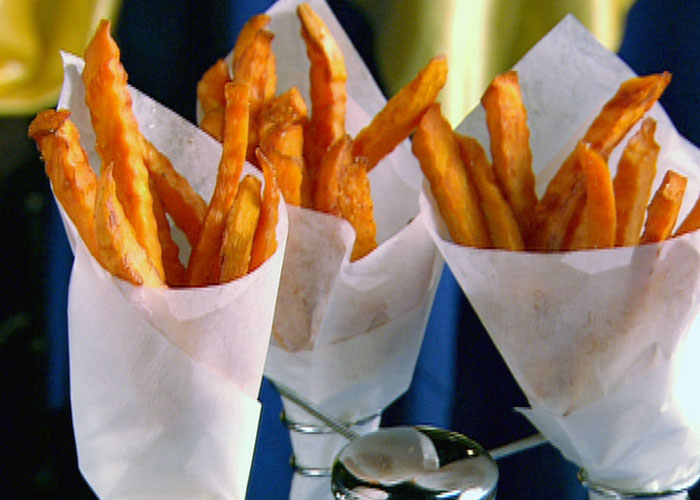
Directions:
- Preheat the oven to 450 degrees. Wash and cut the sweet potatoes into sticks. Try to make all of the sticks equal size to promote even baking.
- In a large mixing bowl, toss uncooked sweet potato sticks with cornstarch until all of the sticks are evenly coated with cornstarch. Add oil and seasonings, and mix until each sweet potato stick is coated with oil and seasonings.
- Place seasoned sweet potato sticks onto a nonstick baking sheet in a single layer. Do NOT overcrowd the baking sheet, as the fries will be not become crisp.
- Bake for 15 minutes, then flip. Bake for an additional 10 to 15 minutes until fries are crispy and golden brown.
- Serve warm.
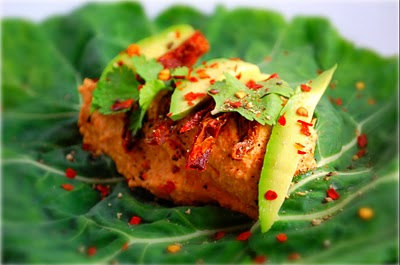
Roasted Veggie Stackers
Roasting vegetables in the oven is a fast and easy way to use vegetables when you aren’t sure what to do with them. Roasting brings out a vegetable’s sweetness and juice, and you may be surprised to learn that you like a previously hated veggie when roasted instead of raw or steamed.
For this example, I roasted eggplant, summer squash, tomatoes, and red onions, but you can roast any vegetables you have in your $2 bag.

Ingredients:
- Vegetables!
- Cooking oil—canola oil and olive oil are heart-healthy and taste great on pretty much any veggie
- Seasonings—any type you like
Equipment Needed:
- Cutting board
- Sharp knife to cut veggies
- Small plate
- Cookie sheet or short baking dish
- Spatula
Instructions:
- Preheat oven to 400 degrees.
- Wash and slice your veggies. Be aware that veggies shrink slightly when roasted, so cut a little more than you think you’ll want.
- Pour a small amount of oil onto a small plate.
- Lightly dip each side of the veggie slices in the plate of oil, shake off any extra oil, and place on cookie sheet or baking dish without overlapping the slices.
- Sprinkle seasonings across the veggie slices. For this example, I used salt, pepper, oregano, and basil. If using salt, use a very, very light sprinkle in order to keep the recipe healthy. You can use any combination of seasonings you like.
- Place in oven and let cook for about 15 minutes or until you start to smell the veggies. Cooking time varies by veggie type and thickness.
- After about 15 minutes, flip the veggies over using a spatula and let cook about another 15 minutes. Check on them about every 5 minutes to make sure they don’t burn.
- Veggies are done when they have brownish, crispy edges and soft middles.
- To make the stackers shown here, just stack the veggies from biggest slice to smallest slice and arrange them to look pretty.
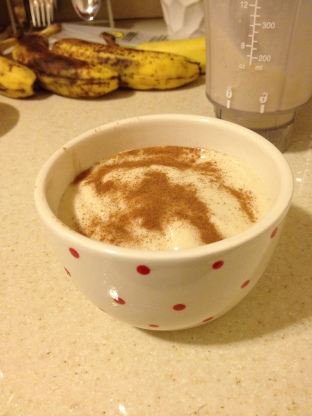
No-Guilt Banana Ice Cream
Wondering what to do with all of those ripe bananas you just got in your $2 bag? Make ice cream in your very own home! In just an hour or so, you can have a sweet frozen treat that is cheap, delicious and creamy, and completely healthy. Yes, there is such a thing as healthy ice cream.
Bananas are high in potassium and low in sodium (good for preventing or managing high blood pressure), and fat-free and cholesterol-free (good for your heart and blood vessels).
To make one bowl of ice cream, you will need:
- 2 bananas
- Splash of milk (only if your blender needs some liquid; more on this later)
- Wash the bananas under running water to get any germs or dirt off the peels.
- Peel the bananas
- Thinly slice the bananas
- Lay the banana slices on a freezer-safe tray, such as a small cookie sheet, cake pan, baking dish, etc. I actually used the lid of a Pyrex baking dish.
- Leave in the freezer for at least 1 hour but not more than 2 hours. They don’t need to be completely frozen and they shouldn’t be rock-hard unless you have a really good blender or food processor.
- When frozen, remove from freezer and put bananas into a blender or food processor.
- Blend until creamy. If your blender won’t blend, add a splash of milk until it will blend. You may want to occasionally give the blender a shake (turn it off first) to get all of the bananas blended.
- Pour into a bowl and enjoy. I sprinkled mine with a little cinnamon to add a little something extra, but the bananas alone are just as amazing.
Caution! Eat it right away because it will start to melt. If you have leftovers (or you would like it to be a little more frozen), you can pour them into a freezer-safe container for later.
Bananas are awesome on their own but if you want a little more variety, you can try adding one of these extras:
- Cinnamon
- Scoop of peanut butter (add while you are blending)
- Sprinkle of hot cocoa mix
- ¼ teaspoon of honey
- Frozen fruit: Berries, peaches, etc.
Avocados!!!
OMG Avocados! And by avocados I mean the 116 or so cases of avocados (2900 lbs.) Fair Foods picked up in the past week. Not only did we have a lot of them, but they were good! And by good, as those who have tried them can vouch, I mean great! I have only seen Fair Foods get avocados a few times ever, and they are often very close to the edge (and admittedly some will already be over the edge or “Guacamole yesterday” as Jason likes to say). But these, oh man.. I have had mine since Friday and they are still bright green inside and boy did they make some awesome guacamole (thank you Jason!)
If you don’t feel like taking the time to guac, avocados are also great sliced on sandwiches, in salads, or by themselves for a healthy snack. Brown avocados are still good for you – rub them on your hair and skin to nourish and moisturize! Read more here
http://www.divavillage.com/article_archive.php?id=24670


Guacamole:
6 Avocados
1 Yellow Onion
1 Large Lime
2 Tomatoes
2-3 Cloves Garlic
1/4 (or less) Bunch Cilantro
Pepper/salt to taste
Guacamole is very easy! Fair Foods has had all of the above items in abundance this month except maybe cilantro, which goes for about 75 cents a bunch at Haymarket. Everyone has their own style, but here’s how I make mine:
First finely dice the onion and throw it in a bowl, then crush or finely chop the garlic and stir it up with the onion. Chop up the tomatoes and throw them in, then squeeze the juice from about half the lime into the mix and stir .
Then slice the avocados in half and pop out the pit, and scrape the innards into the bowl with a spoon. Some avocados will cut brown in some spots, but you can scoop around the brown spots and use the green and yellow flesh. After throwing all the avocado in the bowl, mash it up to a paste with a fork, then stir the whole thing together with a spoon. If it’s too thick, squeeze in the rest of the lime or some more tomato juice. If it’s too chunky, add another avocado! Then chop the cilantro finely and mix it in. Too much cilantro can overpower the taste of the dish, so I use just a little at first. Add salt/pepper and other seasoning (garlic powder, chili powder or chopped jalapeno if you want some spice) to taste. Enjoy!
Salad with Chipotle Hummus

Photos and Recipe by Melody Polakow
With all the greens, tomatoes and onions we get in our $2 Produce Bags, I’ve been eating a lot of salad! One of my favorite “dressings’ is acutally hummus and other bean based spreads. They add a lot of flavor and nutrition to the salad compared to traditional dressings.
If you have a food processor, it is super easy and cheap to make your own hummus! I’ve made a couple changes to traditional hummus by using peanut butter instead of tahini. Just make sure you don’t use peanut butter that has sugar. Natural Peanut Butter will have oil on top and a quick tip is to store the bottle up side down before you open it which will make it easier to stir. You can cook your own beans/chickpeas or used canned. If you use canned, you can heat them up in the microwave first so they’ll be hot. If you don’t like heat, you can omit the Chipotle and add some Chili Powder.
Chipotle Hummus
- 2 large cloves garlic
- 1 t Tony’s creole seasoning
- ¼ t cumin
- ¼ t coriander
- 2 c HOT chickpeas (reserve ½ c cooking liquid)
- 1-2 canned chipotle peppers in adobo sauce or 1 tablespoon chili powder
- 4 T tahini or peanut butter
- 2-4 T chickpea cooking liquid as needed or Olive Oil if you aren’t watching your calories
- Juice of 2 limes ( around 3 T )
- ¼ c chopped cilantro (optional)
- Salt/pepper to taste
Method:
- Pulse garlic and tony’s in food processor until garlic paste is formed
- add the rest of the ingredients and puree until totally smooth
- Taste and adjust seasoning. Add more lime juice if needed.
Another way I love eating hummus is rolled up in greens. You can use Collards, Lettuce, Kale or Chard.
Simple Cilantro Chutney

Photos and Recipe by Melody Polakow
If you find yourself with an abundance of cilantro from your $2 produce bag, this is a great way use it up! This will keep in the fridge for at least 2 weeks and freezes really well. Add a couple tablespoons to beans, rice, veggies, hummus or anywhere you’d like a little zing. It’s great in chili!
- 3 cloves garlic
- 1 habanero pepper (or jalapeno for milder heat)
- 1 large onion, rough chop
- 4 cups packed cilantro (washed very well)
- ½ teaspoon toasted cumin seeds
- ½ teaspoon roasted coriander powder
- 1 tablespoon Tony’s Creole Seasoning
- 3 tablespoons apple cider vinegar
- 2 tablespoons olive oil


Drink your greens!
Here’s a simple way to get more greens into your diet! Drink them!

Photo and Recipe by Melody Polakow
For a basic green smoothie you need:
1 frozen banana
2 cups greens (baby spinach, lettuce) or 1 cup baby collards/kale
1 cup water, non-dairy milk or milk
Blend until smooth. Make sure to add the liquid to the blender first!
You can add any other fruit you have on hand as well. Frozen pineapple is great!
The other day I was chatting with some people about green smoothies in South Boston. We got some papayas in our $2 bag that week and one of the women was really excited to try the green smoothie for her and her granddaughter!

